Tutorial: Wedding Gift Pillow - Pulsing Love
It's been a loaded two weeks between working, searching for sourcing for the new Yippy BeBe changing pad bag line, saying farewell to a friend who moved home, cleaning the house, making gifts and taking care of lil man. I actually thought I posted last Monday, but completely spaced out.
Moving on.
Today, I have a new handmade item to share with you. Over the weekend, two of my friends who are now married, had a wedding dinner to celebrate their recent matrimony. It was a small affair and our first dinner party, but we felt very honored to have been invited and included. Traditionally, many Asian cultures give monetary gifts to help the couple start off on the right foot, but because I love making gifts for friends when they get married, I decided to make them a pillow also.
I actually had a dream about the pillow last Wednesday and that's how it came to fruition. The idea was to use the image of how we see a pulse beating on a monitor onto the pillow. Then give one big pulse into the shape of a heart.
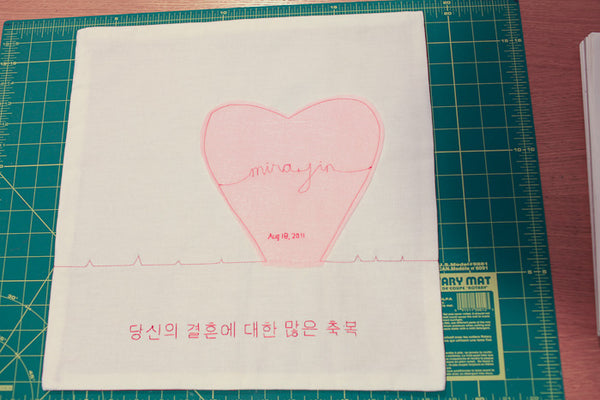
Here's the top of the pillow.
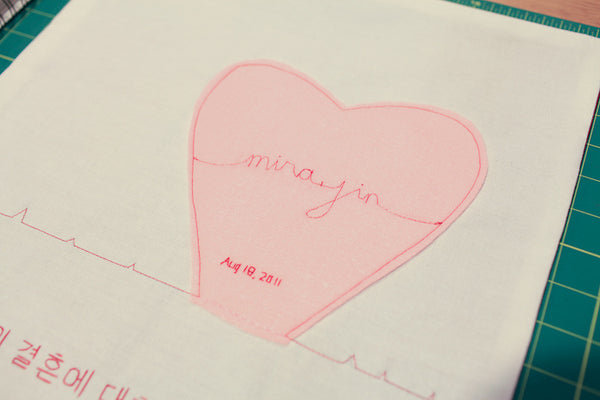
Using the sewing machine, I stitched the pulse line and their name - very slowly. I hand stitched the date onto the heart. They officially signed papers over the summer, so I placed that date onto the pillow. The bottom of the heart was hand-stitched closed with pink so it would blend in with the heart.
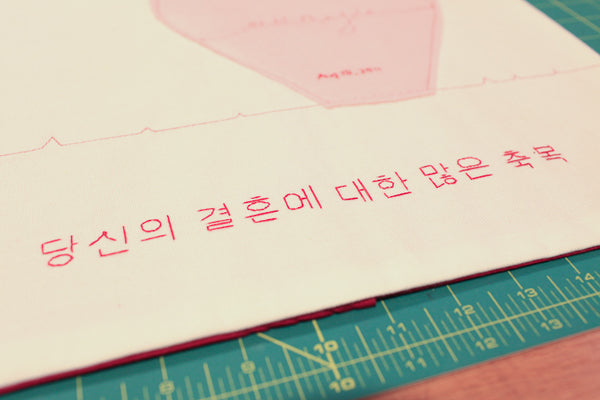
The couple is Korean, so I chose to add a Korean phrase to the pillow wishing their marriage blessings. I did this by hand also. I spoke to a different friend of mine who provided this phrase to me. It says: "Many blessings on your marriage".
Here's a photo of the whole pillow case
And here's the final pillow
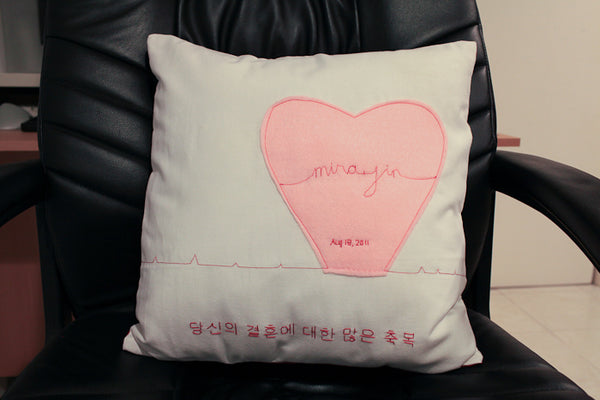

I didn't take a photo of the back, but it's red to match the stitching. No zippers on this pillow, it's an envelope back closure.
Materials used:
- 17" of white cotton fabric
- 19" of red cotton fabric - cut into two pieces for the envelope fold
- Piece of felt to cut out the heart shape
- Embroidery/cross-stitching yarn
What I did:
- After trimming my fabric pieces, I used a fabric pencil to draw out the pulse line and the Korean lettering
- I attached the heart to the white fabric using my sewing machine by stitching the pulse line and the outline of the heart
- From there I stitched the names onto the heart
- Then I hand stitched the date, bottom of the heart and Korean lettering
- The final step was to stitch the red fabric to the white fabric together (right sides facing each other) making sure to have the envelope fold closure overlapped properly
Have a great week!
Leave a comment
Comments will be approved before showing up.